
If you’ve ever opened Adobe Illustrator and wondered whether you’re seeing all available tools, you’re not alone. Many users ask how to show hidden tools in Illustrator because Adobe intentionally keeps certain tools tucked away beneath others. These hidden tools are designed to keep the interface clean while still giving users access to powerful design features.
Hidden tools are secondary tools grouped beneath visible toolbar icons. They often include specialized functions, such as the Scissors Tool, Knife Tool, and Width Tool, that can dramatically improve precision and workflow efficiency.
Many beginners and even experienced designers struggle with Hidden Tools Illustrator settings because Adobe often groups tools inside expandable menus that are not immediately visible.
Understanding how to access and manage hidden tools can dramatically improve your workflow. Whether your Adobe Illustrator toolbar disappeared, your Illustrator tools panel is missing, or you simply want to customize your workspace, learning how to show hidden tools is essential.
Adobe Illustrator includes dozens of powerful design features, but many remain tucked behind hidden toolbar icons. These tools can help you draw faster, edit more precisely, and create professional-quality vector graphics. Once you learn how to expand toolbar options and access hidden Illustrator editing tools, your design efficiency improves immediately.
This complete guide explains everything from locating hidden tools and restoring missing panels to editing the toolbar and maximizing productivity using Adobe Illustrator tools.
Table of Contents
What Hidden Tools Are
Hidden tools are additional design tools nested behind primary icons in Illustrator’s toolbar. Adobe uses this structure to prevent the toolbar from becoming overwhelming, especially for beginners.
For example:
- The Rectangle Tool hides:
- Rounded Rectangle Tool
- Ellipse Tool
- Polygon Tool
- Star Tool
- Flare Tool
- The Eraser Tool hides:
- Scissors Tool
- Knife Tool
These hidden options expand Illustrator’s capabilities without cluttering the workspace.
Why AI Tools Are Essential
Artificial intelligence is transforming creative software, and Adobe Illustrator is no exception. AI-powered features now help users discover, organize, and optimize tool usage.
When working with Illustrator’s Hidden Tools, AI can simplify the process by suggesting relevant tools based on your behavior.
Benefits include:
- Smart toolbar recommendations
- Personalized workspace optimization
- Faster tool discovery
- Reduced learning curve for beginners
- Improved productivity through automation
For example, Adobe Sensei can recommend Illustrator workspace tools based on your design activity. If you frequently edit vector paths, Illustrator may prioritize Pen Tool variations or shape-building options.
Students and professionals benefit because AI reduces the time spent searching through hidden toolbar icons. Instead of manually hunting for grouped tools, AI can surface likely-needed options.
High-authority sources such as the Adobe Help Center and Google UX studies emphasize intelligent interface adaptation as a major productivity trend.
AI doesn’t replace understanding the Adobe Illustrator toolbar, it enhances it. Learning manual tool access alongside AI-assisted discovery ensures complete mastery.
Read More: How To Use a VPN on a Windows 11 Laptop Free and Securely
Why Adobe Illustrator Hides Extra Tools
Adobe designed Illustrator to accommodate both beginners and professionals. Showing every tool at once could make the interface confusing.
Reasons Adobe hides tools include:
- Cleaner workspace
- Simplified beginner experience
- Better organization of related tools
- Faster navigation through grouped functions
This layered approach helps users focus on essential tools while advanced features remain accessible when needed.
Benefits of Using Advanced Tools
Learning how to access hidden tools can significantly improve your design speed and creativity.
Key benefits include:
| Benefit | Description |
| Greater precision | Specialized tools offer better control |
| Faster workflow | Less time searching through menus |
| Creative flexibility | Access to advanced shape and editing options |
| Professional results | Better vector manipulation capabilities |
For example, the Width Tool allows dynamic stroke adjustments, while the Shape Builder Tool makes combining objects incredibly easy.
Understanding the Illustrator Toolbar
Before learning how to show hidden tools in Illustrator, it’s essential to understand how the Illustrator toolbar works.
The toolbar is your main command center. Nearly every design action begins there.
Overview of the Tools Panel
The Illustrator toolbar typically appears on the left side of the screen and contains tools for:
- Selection
- Drawing
- Text
- Painting
- Transformation
- Navigation
Each icon represents either:
- A single tool
- A group of related hidden tools
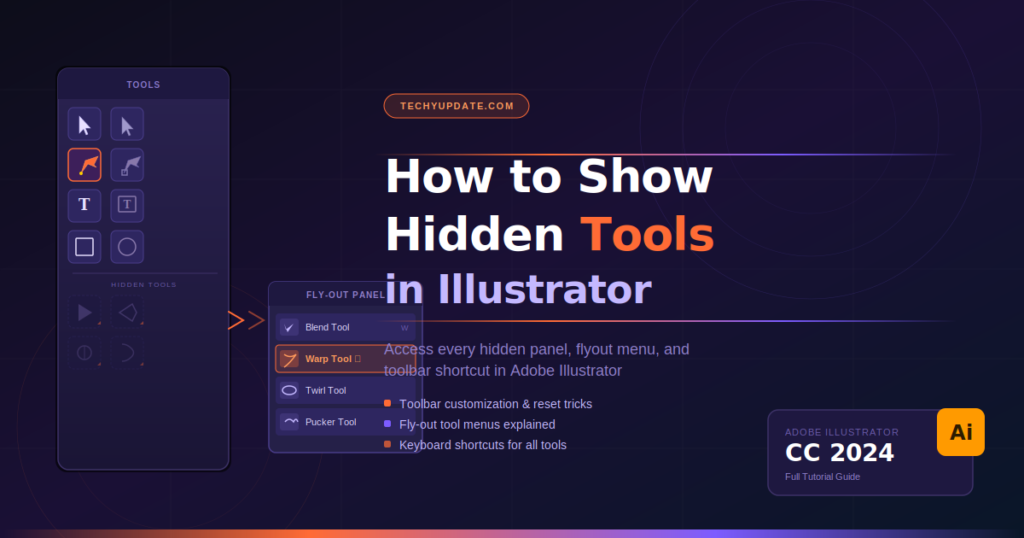
A tiny triangle icon in the bottom-right corner of a tool indicates that hidden options are available.
To reveal them:
- Click and hold the tool icon.
- A fly-out menu appears.
- Select the hidden tool you want.
It’s that simple.
Difference Between Basic and Advanced Toolbar
Illustrator offers two toolbar modes:
Basic Toolbar
This is the default layout and shows only commonly used tools.
Ideal for:
- Beginners
- Casual users
- Simple projects
Advanced Toolbar
This displays nearly all available Illustrator tools.
Ideal for:
- Professional designers
- Complex illustrations
- Faster access to specialized features
To switch to the Advanced Toolbar:
- Open Illustrator.
- Go to Window > Toolbars > Advanced.
- Your full toolbar will appear instantly.
This is one of the fastest ways to show hidden tools.
Customizing the Toolbar Layout
Adobe Illustrator allows complete toolbar customization.
To customize:
- Click the three dots (…) at the bottom of the toolbar.
- Select Edit Toolbar.
- Drag hidden tools into the main toolbar.
- Rearrange tools as needed.
- Save your custom layout.
Customizing your toolbar helps reduce clicks and speeds up repetitive tasks.
For official Adobe Illustrator documentation, visit: https://helpx.adobe.com/illustrator
How Hidden Tools Work in Illustrator
Illustrator organizes tools into logical groups. Hidden tools usually share similar functions with the main visible tool.
Examples include:
| Visible Tool | Hidden Tools |
| Pen Tool | Add Anchor Point, Delete Anchor Point, Anchor Tool |
| Shape Tool | Ellipse, Polygon, Star |
| Eraser Tool | Scissors, Knife |
| Scale Tool | Rotate, Reflect, Shear |
Look for the small triangle on tool icons.
Access hidden tools by:
- Clicking and holding
- Right-clicking (sometimes)
- Using keyboard shortcuts
- Adding them permanently through customization
Understanding this structure makes Illustrator much easier to navigate.
Steps to Show Hidden Tools in Illustrator
Adobe Illustrator includes many powerful tools that are hidden beneath grouped icons to keep the workspace clean and organized. Knowing how to reveal and manage these hidden tools can significantly improve your workflow and unlock advanced design capabilities. Below are the most effective methods to show hidden tools in Illustrator.
Method 1: Expand Hidden Tool, Groups
The easiest and fastest way to access hidden tools is by expanding grouped tool icons directly from the toolbar.
Locate Grouped Icons
Open Adobe Illustrator and look at the toolbar on the left side of the screen. Some tool icons display a small triangle (arrow) in the bottom-right corner. This small arrow indicates that additional tools are hidden under that icon.
Common grouped icons include:
- Rectangle Tool
- Pen Tool
- Eraser Tool
- Scale Tool
These tool groups contain several related hidden options.
Click and Hold to Reveal More Tools
To access hidden tools:
- Move your cursor over a tool with a small arrow.
- Click and hold the icon for one to two seconds.
- A fly-out menu will appear.
- All related hidden tools will be displayed.
This menu lets you browse and select the tool you need.
Select the Desired Hidden Tool
Once the hidden tools appear:
- Click the desired tool to activate it.
- Illustrator may replace the visible icon with your selected tool to make it easier to access in the future.
This method is ideal for quick, temporary tool changes during design work.
Method 2: Use the “Edit Toolbar” Option
If you frequently use hidden tools, adding them permanently to your toolbar can save time.
Opening the Edit Toolbar Menu
To customize your toolbar:
- Scroll to the bottom of the Illustrator toolbar.
- Click the three dots (…) icon.
- The Edit Toolbar panel will open.
This panel displays all hidden and available Illustrator tools.
Dragging Hidden Tools into the Main Toolbar
Inside the Edit Toolbar panel:
- Find the hidden tool you want easier access to.
- Click and drag it into the main toolbar.
- Drop it in your preferred location.
This makes the tool permanently visible in your workspace.
Saving Workspace Changes
After customizing:
- Close the Edit Toolbar panel.
- Illustrator automatically saves the toolbar arrangement.
- For extra security, save your workspace through:
Window > Workspace > New Workspace
This helps preserve your custom setup for future projects.
Method 3: Reset the Illustrator Workspace
Sometimes tools disappear completely due to accidental changes or software updates. Resetting the workspace often solves this issue.
When Tools Disappear Completely
You may notice:
- Missing toolbar icons
- Hidden panels
- Rearranged workspace layout
- Tools no longer accessible
This usually happens after changing workspace presets or after Illustrator updates.
Resetting Workspace Settings
To reset:
- Click Window in the top menu.
- Select Workspace.
- Choose your current workspace (usually Essentials).
- Click Reset Essentials.
Illustrator will restore the default layout.
Restoring Default Toolbar Configuration
If custom toolbar settings caused issues:
- Open Edit Toolbar
- Choose Restore Defaults
- Confirm the reset
This returns all tools to their original positions.
Hidden Tools in Adobe Illustrator
Many of Illustrator’s most useful tools are hidden. Here are some important ones to know.
Shape Builder Tool
The Shape Builder Tool allows you to merge, subtract, and combine shapes quickly.
Benefits:
- Easy object merging
- Fast custom shape creation
- Cleaner vector editing
Shortcut: Shift + M
Eraser Tool
The Eraser Tool removes parts of vector objects freely.
Uses include:
- Cleaning rough edges
- Creating organic cuts
- Quick shape adjustments
Shortcut: Shift + E
Knife Tool
Hidden under the Eraser Tool, the Knife Tool cuts objects into separate pieces.
Perfect for:
- Splitting shapes
- Creating custom fragments
- Advanced vector manipulation
Perspective Grid Tool
This tool helps create realistic 3D-like artwork using perspective guides.
Useful for:
- Architectural illustrations
- Product mockups
- Technical designs
Shortcut: Shift + P
Width Tool
The Width Tool allows dynamic adjustment of stroke thickness along a path.
Benefits:
- Variable stroke widths
- Professional calligraphy effects
- More expressive vector lines
Shortcut: Shift + W
Tips for Managing Illustrator Tools Efficiently
Efficient tool management helps you work faster and stay organized.
Organizing Frequently Used Tools
Keep your most-used tools visible by:
- Adding them to the main toolbar
- Grouping related tools together
- Removing rarely used tools
This reduces searching and saves time.
Creating a Personalized Workspace
Customize your Illustrator environment by arranging:
- Toolbars
- Panels
- Windows
- Shortcut layouts
Save your setup using:
Window > Workspace > New Workspace
A personalized workspace improves comfort and speed.
Using Shortcuts to Improve Productivity
Learning shortcuts minimizes interruptions.
Popular shortcuts include:
| Shortcut | Tool |
| V | Selection Tool |
| P | Pen Tool |
| M | Rectangle Tool |
| Shift + M | Shape Builder |
| Shift + E | Eraser |
| Shift + W | Width Tool |
The more shortcuts you memorize, the faster your design process becomes.
Troubleshooting Hidden Tool Issues
Sometimes Illustrator may not display tools properly. Here’s how to fix common issues.
Toolbar Not Displaying Properly
Try these steps:
- Restart Illustrator
- Reset workspace
- Switch from Basic to Advanced Toolbar
Access the advanced toolbar through:
Window > Toolbars > Advanced
Missing Tools After Updates
Software updates can alter toolbar layouts.
To restore tools:
- Open Edit Toolbar
- Re-add missing tools
- Reset your workspace
Resetting Illustrator Preferences
If problems continue:
- Close Illustrator
- Reopen while holding:
- Alt + Ctrl + Shift (Windows)
- Option + Command + Shift (Mac)
- Confirm preference reset
This often fixes persistent toolbar issues.
Benefits of Unlocking Hidden Tools
Accessing hidden tools provides major advantages.
Faster Design Workflow
Less searching means:
- Faster edits
- Quicker tool switching
- Better efficiency
Improved Creative Flexibility
Hidden tools expand your creative options by offering:
- More drawing techniques
- Advanced editing controls
- Better shape manipulation
Better Control Over Vector Editing
Specialized tools improve precision and professionalism.
You gain:
- Cleaner paths
- More accurate cuts
- Dynamic stroke control
Hidden Tools Illustrator
The Hidden Tools Illustrator system groups related tools beneath a single toolbar icon.
You can identify hidden tools by looking for a tiny arrow in the lower-right corner of a tool icon. Clicking and holding reveals additional tools.
Examples include:
- Rectangle Tool → Rounded Rectangle, Ellipse, Polygon
- Pen Tool → Add Anchor Point, Delete Anchor Point
- Shape Builder Tool variations
- Eraser Tool group
- Gradient Tool family
How to access hidden tools:
- Open Illustrator
- Locate the Tools Panel
- Find icons with small arrow indicators
- Click and hold the icon
- Select the hidden option
This feature keeps the Adobe Illustrator toolbar organized while maintaining access to advanced functions.
Many beginners assume tools are missing when they’re simply hidden. Knowing this distinction saves frustration.
Use the Hidden Tools Illustrator frequently to unlock Illustrator editing tools that improve vector design precision.
How to Access Hidden Tools in Illustrator

Learning how to access hidden tools in Illustrator is essential for unlocking Adobe Illustrator’s full design potential. Many powerful tools are tucked away beneath visible toolbar icons to keep the interface clean and user-friendly. Once you know where to look, accessing these hidden tools becomes quick and easy.
Whether you’re a beginner or an experienced designer, understanding hidden tools can significantly improve your workflow and help you work more efficiently. In this guide, you’ll learn three simple methods to reveal and use hidden tools in Adobe Illustrator.
How do you access hidden tools in Photoshop
Adobe Photoshop uses a similar hidden tool structure.
To reveal:
- Click and hold tool icons
- Use keyboard shortcuts
- Customize toolbar through Edit > Toolbar
Learning both Illustrator and Photoshop’s hidden tools creates cross-platform efficiency.
Clicking and Holding Toolbar Icons
The most common way to access hidden tools in Illustrator is to click and hold toolbar icons.
Adobe groups similar tools under one visible icon to reduce clutter. These grouped tools remain hidden until you manually reveal them.
How to Click and Hold to Reveal Hidden Tools
Follow these simple steps:
- Open Adobe Illustrator.
- Look at the toolbar on the left side of your screen.
- Find a tool icon with a small triangle in the bottom-right corner.
- Click and hold that icon for a second.
- A fly-out menu will appear showing all hidden tools in that group.
- Click the tool you want to use.
Example of Hidden Tool Groups
Here are common examples:
| Visible Tool | Hidden Tools You Can Access |
| Rectangle Tool | Rounded Rectangle, Ellipse, Polygon, Star, Flare |
| Pen Tool | Add Anchor Point, Delete Anchor Point, Anchor Tool |
| Eraser Tool | Scissors Tool, Knife Tool |
| Scale Tool | Rotate Tool, Reflect Tool, Shear Tool |
This click-and-hold method is the fastest way to explore Illustrator’s hidden features.
Tip for Faster Workflow
After selecting a hidden tool, Illustrator often remembers your last choice and places it in the main toolbar for quicker reuse.
Identifying Tools with Small Arrow Indicators
One of the easiest ways to tell whether a tool has hidden options is to look for small arrow indicators.
What the Small Arrow Means
A tiny triangle or arrow in the lower-right corner of a tool icon indicates that additional tools are hidden beneath it.
These indicators serve as visual cues that signal more options are available.
How to Spot Them Easily
When scanning your toolbar, pay attention to icons such as:
- Shape Tools
- Selection Tools
- Drawing Tools
- Transformation Tools
Many of these contain grouped tools.
For example:
- A small arrow on the Rectangle Tool means multiple shape options are available.
- A small arrow on the Pen Tool means anchor editing tools are hidden.
- A small arrow on the Eraser Tool reveals cutting tools.
Why Adobe Uses Arrow Indicators
Adobe uses these indicators to:
- Keep the interface organized
- Reduce visual clutter
- Group similar functions together
- Make advanced tools accessible without overwhelming beginners
Once you train yourself to notice these small arrows, navigating Illustrator becomes much easier.
Using Keyboard Shortcuts for Quick Access
Another efficient way to access hidden tools in Illustrator is through keyboard shortcuts.
Shortcuts allow you to skip menus entirely and switch tools instantly.
Common Illustrator Tool Shortcuts
Here are some useful keyboard commands:
| Shortcut Key | Tool |
| V | Selection Tool |
| A | Direct Selection Tool |
| P | Pen Tool |
| M | Rectangle Tool |
| L | Ellipse Tool |
| B | Paintbrush Tool |
| Shift + E | Eraser Tool |
| C | Scissors Tool |
| Shift + W | Width Tool |
Using shortcuts can dramatically improve your speed.
Cycling Through Hidden Tools
Some Illustrator shortcuts allow you to cycle through grouped tools by pressing Shift + shortcut key repeatedly.
For example:
- Press Shift + M to access different shape tools.
- Press Shift + E to cycle through Eraser-related tools.
- Press Shift + W for Width Tool options.
This method is especially useful for advanced users who want to work faster without interrupting their design flow.
Benefits of Keyboard Shortcuts
Using shortcuts helps you:
- Save time
- Reduce mouse clicks
- Improve productivity
- Build professional design habits
The more shortcuts you memorize, the more efficient your Illustrator workflow becomes.
Adobe Illustrator toolbar disappeared
One of the most common issues users face is when the Adobe Illustrator toolbar disappears unexpectedly.
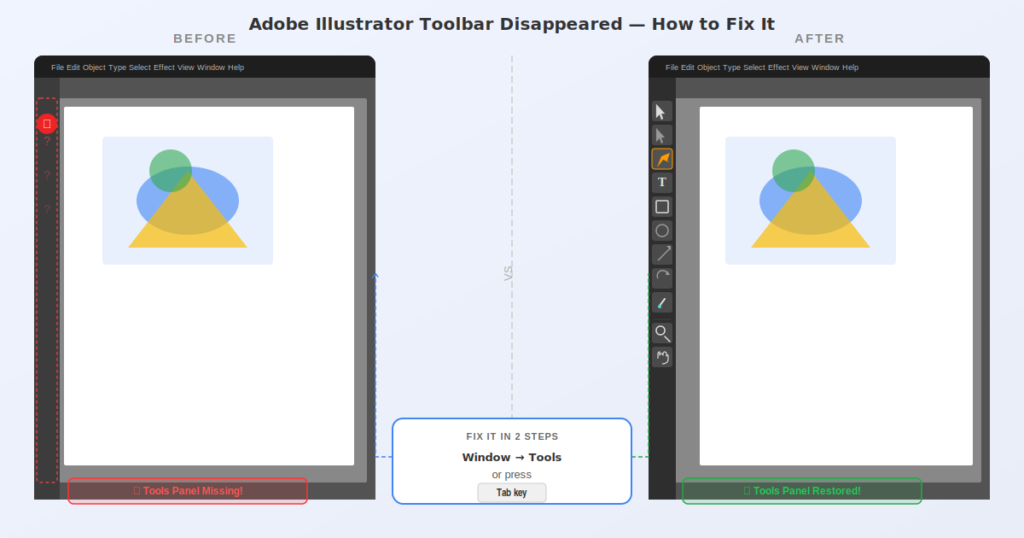
Common causes include:
- Workspace changes
- Accidental panel closing
- Software glitches
- Corrupted preferences
How to restore it:
- Go to the Window
- Select Tools
- Choose Advanced or Basic
Alternative method:
- Window → Workspace → Reset Essentials
Keyboard shortcut troubleshooting:
- Press Tab to toggle hidden panels
If the toolbar remains missing:
- Restart Illustrator
- Update software
- Reset preferences
Many users panic when the Illustrator tools panel disappears, but recovery usually takes less than a minute.
Adobe recommends using the latest Creative Cloud versions for improved toolbar stability.
Illustrator hide toolbar shortcut
Knowing the Illustrator hide toolbar shortcut can instantly solve visibility issues.
Useful shortcuts:
- Tab → Hide/show all panels
- Shift + Tab → Hide/show side panels
- F key → Screen mode changes
These shortcuts help when your workspace looks cluttered or when panels disappear accidentally.
For example:
A student working on a logo design may press Tab inadvertently, causing every panel—including Adobe Illustrator tools to disappear.
Pressing Tab again restores everything.
Shortcut mastery improves efficiency by reducing the time spent navigating menus.
Create habit memory by practicing these commands regularly.
Adobe Illustrator tools panel
The Adobe Illustrator tools panel is your design control center.
It includes:
- Selection Tool
- Direct Selection Tool
- Pen Tool
- Brush Tool
- Shape Tools
- Type Tool
- Eyedropper
- Gradient Tool
- Zoom Tool
Two toolbar modes exist:
- Basic Toolbar
- Advanced Toolbar
Advanced mode reveals more Illustrator workspace tools and hidden toolbar icons.
To switch:
Window → Toolbars → Advanced
Students should begin with Basic, then move to Advanced as they grow.
Understanding panel organization helps users locate Hidden Tools Illustrator features faster.
Illustrator tools panel missing
When the Illustrator tools panel is missing, it usually results from workspace settings.
Fix methods:
Reset Workspace
Window → Workspace → Essentials Classic → Reset
Enable Tools Panel
Window → Tools → Advanced
Preference Reset
Hold:
Ctrl + Alt + Shift (Windows)
Cmd + Option + Shift (Mac)
while launching Illustrator.
This restores factory settings.
Always save custom workspaces to avoid losing setup.
Adobe Illustrator Tools Name and Work
Understanding the names and uses of Adobe Illustrator tools improves design speed.
Important tools:
Selection Tool
Moves objects.
Direct Selection Tool
Edits anchor points.
Pen Tool
Creates custom paths.
Type Tool
Adds text.
Shape Builder Tool
Combines shapes.
Pathfinder Tools
Merges and subtracts vector elements.
Learning each tool’s purpose makes it easier to discover hidden tools.
Adobe Illustrator Tools Hidden
Adobe Illustrator tools hidden by default are usually grouped for simplicity.
Examples:
- Warp Tools
- Knife Tool
- Puppet Warp
- Blend Tool
- Perspective Grid options
To reveal them:
Window → Toolbars → Advanced
Or click the Edit Toolbar at the bottom.
This expands toolbar options and lets you drag hidden tools into visible space.
How to Edit The Toolbar in Illustrator
Customizing your toolbar improves workflow.
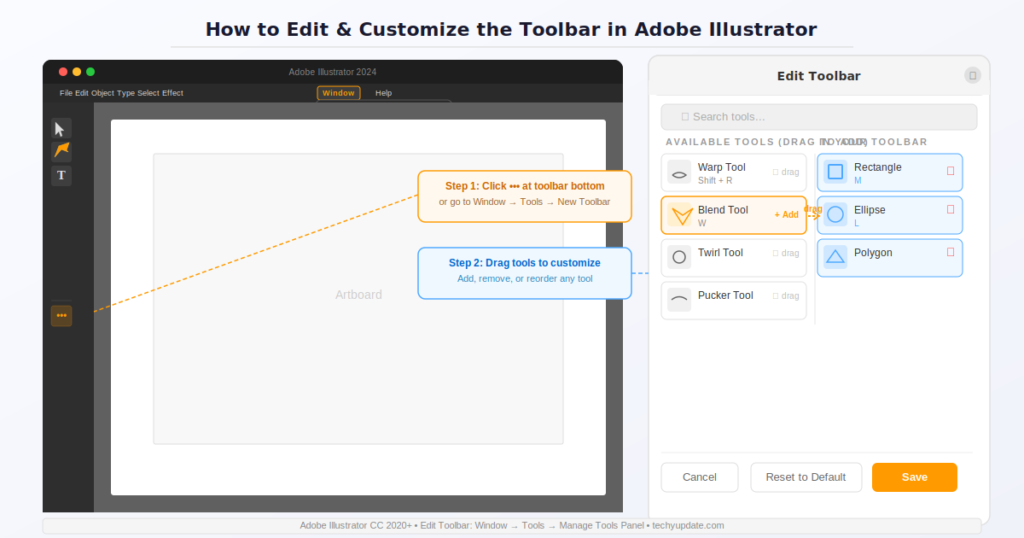
Steps:
- Click the three dots at the bottom of the toolbar
- Open Edit Toolbar
- Drag tools into preferred positions
- Remove unused tools
Benefits:
- Faster access
- Personalized design environment
- Less clutter
Pro Tip Box:
Keep frequently used hidden tools visible permanently.
Illustrator workspace tools
Workspace tools determine what panels are visible.
Popular workspaces:
- Essentials
- Painting
- Typography
- Web
- 3D
Choose based on project type.
Window → Workspace
Different layouts can automatically hide or reveal Illustrator editing tools.
Expand toolbar AutoCAD
AutoCAD and Illustrator share expandable toolbar concepts.
In AutoCAD:
- Click dropdown arrows
- Expand hidden command groups
Understanding one Adobe-like interface helps users adapt to others.
Hidden toolbar icons
Hidden toolbar icons improve interface cleanliness but can confuse beginners.
Indicators:
- Small arrows
- Collapsed groups
- Edit Toolbar drawer
Always inspect grouped icons before assuming a tool is unavailable.
Productivity and Time Management
Knowing how to Show Hidden Tools saves significant time.
Productivity gains:
- Faster design execution
- Less menu searching
- Better workflow consistency
Students can complete assignments more quickly by customizing the visible tools.
Professionals save hours weekly.
Show hidden tools in Illustrator for Coding and Technical Skills
Technical learners benefit from Illustrator’s precision tools for UI design, wireframing, and SVG export.
Useful hidden tools:
- Slice Tool
- Graph Tool
- Perspective Grid
Developers creating app assets should master these features.
Pro Tips to Maximize
Pro Tips Box:
- Use the Advanced Toolbar always
- Memorize shortcut keys
- Save custom workspaces
- Keep frequently used hidden tools pinned
- Reset preferences when glitches occur
Common Mistakes
Common mistakes:
- Thinking tools are deleted
- Using the Basic toolbar only
- Ignoring toolbar customization
- Not saving workspace settings
- Forgetting Tab shortcut
Avoiding these errors speeds learning dramatically.
Expert Insights on AI Learning Trends
Experts predict AI-guided interfaces will automatically surface hidden tools based on design context.
Adobe Sensei already suggests tools intelligently.
Future trends include:
- Predictive tool access
- Voice-command tool activation
- Adaptive workspace layouts
Google and OpenAI research indicate that interface personalization is the future.
Quick Summary
To master Hidden Tools, Illustrator:
- Look for arrow indicators
- Click and hold icons
- Use Window → Toolbars → Advanced
- Edit toolbar for customization
- Reset the workspace if tools disappear
- Learn keyboard shortcuts
- Save personalized layouts
Mastering hidden tools transforms Illustrator from a confusing tool to an efficient one.
Frequently Asked Questions
Why can’t I see all the tools in Illustrator?
You may be using the Basic Toolbar. Switch to Advanced Toolbar under Window > Toolbars.
What does the small triangle on a tool mean?
It indicates hidden tools are nested beneath that icon.
Can I permanently display hidden tools?
Yes. Use the Edit Toolbar to drag hidden tools into your main panel.
Did Adobe remove some tools?
Usually, they are often hidden or grouped differently after updates.
Does Illustrator on iPad have hidden tools?
Yes, but the interface is simplified and tools may appear differently.
How do I reset my toolbar?
Go to Window > Workspace > Reset Essentials.
How do I show hidden tools in Illustrator?
Click and hold any toolbar icon with a small arrow. Hidden tool options will appear in a flyout menu.
Why did my Illustrator toolbar disappear?
It may be hidden due to workspace changes or accidental shortcut use. Press Tab or reset your workspace.
What is the shortcut to hide or show the toolbar in Illustrator?
Press Tab to toggle all panels on or off.
How do I restore missing tools in Illustrator?
Go to Window > Toolbars > Advanced or reset your workspace.
Can I customize the Illustrator toolbar?
Yes. Click Edit Toolbar and drag tools into preferred positions.
Why are some Illustrator tools hidden?
Adobe groups related tools to reduce clutter and simplify navigation.
Does Photoshop use hidden tools, too?
Yes. Photoshop also hides related tools under expandable toolbar icons.
What is the difference between the Basic and the Advanced toolbar?
Basic shows essential tools. Advanced reveals full Adobe Illustrator tools.
Can AI help me find hidden Illustrator tools?
Yes. Adobe Sensei can recommend tools based on usage patterns.
What’s the fastest way to improve Illustrator workflow?
Customize your toolbar, memorize shortcuts, and keep frequently used hidden tools visible.
Conclusion
Learning how to show hidden tools in Illustrator can dramatically improve your efficiency and unlock powerful design features you may not even know exist. Adobe hides tools to simplify the interface, but once you understand how the toolbar works, accessing advanced functions becomes easy.
Whether you choose to click and hold tool icons, switch to the Advanced Toolbar, or customize your own workspace, these methods will help you work faster and smarter in Adobe Illustrator.
Knowing how to access hidden tools in Illustrator can transform how you work. By simply clicking and holding toolbar icons, identifying small arrow indicators, and using keyboard shortcuts, you can quickly unlock powerful features hidden beneath the surface.
These tools are designed to make Illustrator more flexible and efficient. Once you begin using them regularly, your design process will become faster, smoother, and much more professional.
Learning how to show hidden tools in Illustrator is one of the best ways to improve your design skills and productivity. Many of Adobe Illustrator’s most powerful features are tucked away behind grouped icons, waiting to be discovered.
By expanding hidden tool groups, customizing your toolbar, and resetting your workspace when needed, you can unlock a smoother and more efficient workflow.
Importance of Learning Hidden Illustrator Features
Mastering hidden tools helps you:
- Work smarter
- Design faster
- Create more professional artwork
Best Practices for Tool Management
To stay organized:
- Customize your toolbar regularly
- Save personalized workspaces
- Learn useful shortcuts
Enhancing Productivity in Adobe Illustrator
The better you understand Illustrator’s hidden features, the more confident and efficient you’ll become. Unlock these tools, and you’ll transform the way you create vector designs.